How to change the WordPress theme manually
This article describes how to change the WordPress theme manually.
Normally, you can change themes in WordPress quickly and easily by using the administration dashboard. However, there may be occasions when the administration dashboard is inaccessible (due to a misbehaving theme, for example). In such a scenario, you can manually change the WordPress theme to regain access to the administration dashboard.
Changing the WordPress theme manually
Use either of the following methods to change the WordPress theme.
Method #1: Rename and copy theme folders
You can rename the existing theme folder and copy a new theme folder in its place. To do this, follow these steps:
- Log in to cPanel.If you do not know how to log in to your cPanel account, please see this article.
- In the FILES section of the cPanel home screen, click File Manager:

- In the left sidebar, click the name of the folder where WordPress is installed. The folder's contents appear in the right pane.
- Navigate to the wp-content/themes folder.
- Right-click the folder of the currently installed theme, and then click Rename.
- Add a suffix to the new name so you can remember which folder contains the original theme. For example, if the theme name is twentytwenty, you could type twentytwenty.original, and then click .
- Right-click the folder of the new theme that you want to use, and then click Copy.
- Type the name of the original theme. For example, if the theme in step 5 is named twentytwenty, type twentytwenty, and then click . The new theme takes effect immediately.
Method #2: Modify the WordPress database
You can use phpMyAdmin to modify the WordPress database directly and change the active theme. To do this, follow these steps:
- Log in to cPanel.If you do not know how to log in to your cPanel account, please see this article.
- In the DATABASES section of the cPanel home screen, click phpMyAdmin:

In the left-hand pane of phpMyAdmin, click the WordPress database. A list of tables in the database appears:
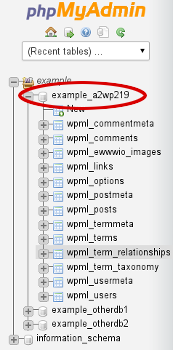 Typically, the WordPress database is username_wpXXX or username_a2wpXXX, where username represents your cPanel username, and XXX is a three-digit number.
Under the Table heading, click the wp_options table:
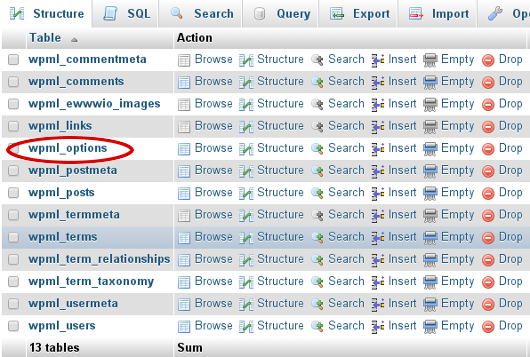
A list of data rows appears.
Under the option_name heading, locate template, and then click Edit:
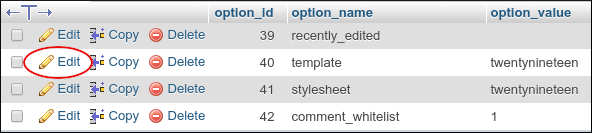 You may have to scroll through more than one page of data in the wp_options table to locate the template row. To do this, click the > icon, or you can click Show all to view all of the table's rows at once.
- In the option_value text box, replace the current theme with the name of the new theme that you want to use.
- Click Go. phpMyAdmin saves the changes in the table.
Under the option_name heading, locate stylesheet, and then click Edit:
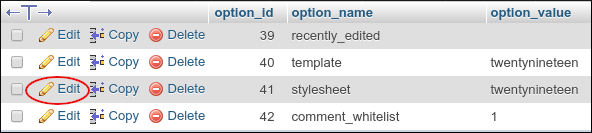 You may have to scroll through more than one page of data in the wp_options table to locate the stylesheet row. To do this, click the > icon, or you can click Show all to view all of the table's rows at once.
- In the option_value text box, replace the current theme with the name of the new theme that you want to use.
- Click Go. phpMyAdmin saves the changes in the table. The WordPress user interface should now function correctly using the new theme.
Article Details
- Product: All accounts
- Level: Intermediate
Grow Your Web Business
Subscribe to receive weekly cutting edge tips, strategies, and news you need to grow your web business.
No charge. Unsubscribe anytime.
Did you find this article helpful? Then you'll love our support. Experience the A2 Hosting difference today and get a pre-secured, pre-optimized website. Check out our web hosting plans today.