How to set up multiple versions of Ruby with the cPanel Ruby Selector
Shared, Reseller, Turbo Boost, and Turbo Max Web Hosting using the cPanel control panel and running CloudLinux offer multiple versions of Ruby. You can set up your account to use one version or several. Instructions for both options are shown in this article.
Setting up one Ruby version
To set up one Ruby version for use at the command line, follow these steps:
- Log into your account using SSH.
- See the available Ruby versions by typing the command as shown and viewing the results.
[email protected] [~]# ls /opt/alt | grep ruby
ruby18/
ruby19/
ruby20/
ruby21/
ruby22/
ruby23/
ruby24/
ruby25/
ruby26/
The two digits on each line in the listing represent the version number, where the actual version number has a dot between the 2 digits. For example, ruby26 is Ruby version 2.6.
- Choose a version to use. In this example, we use Ruby 2.6.
Create a directory for local gems.
Some gems are pre-installed globally on the server, but additional gems must be installed in the user account.
The directory ~ruby/gems is used here but other values may be used.[email protected] [~]# mkdir -p ~/ruby/gems
Edit the file ~/.bash_profile and add these lines at the bottom, replacing items in red with the desired values for your installation:
RUBYHOME="/opt/alt/ruby26"
ORIG_GEM_HOME=$("$RUBYHOME/bin/gem" --config-file "" env GEM_HOME)
GEM_HOME="$HOME/ruby"
GEM_PATH="$GEM_HOME:$ORIG_GEM_HOME"
GEM_SPEC_CACHE="$GEM_HOME/specs"
PATH="$RUBYHOME/bin:$PATH"
export RUBYHOME
export GEM_HOME
export GEM_PATH
export GEM_SPEC_CACHE
export PATH
Update your environment with the following command:
[email protected] [~]# source ~/.bash_profile
Check the installation with this command:
[email protected] [~] ruby -v
ruby 2.6.1p33 (2019-01-30 revision 66950) [x86_64-linux]
The configured Ruby version will now be available each time you log in.
Setting up multiple Ruby versions with the Ruby Selector
The Ruby Selector makes it possible to use multiple versions of Ruby in your account by creating a virtual environment for each desired version.
To create a virtual environment, follow these steps:
- Log in to cPanel.If you do not know how to log in to your cPanel account, please see this article.
- Open the Ruby App tool:
- If you are using the Jupiter theme, on the Tools page, in the Software section, click Setup Ruby App:

If you are using the Paper Lantern theme, in the SOFTWARE section of the cPanel home page, click Setup Ruby App:

- If you are using the Jupiter theme, on the Tools page, in the Software section, click Setup Ruby App:
- Click the Setup Ruby App icon in the SOFTWARE section of cPanel.
Select the desired Ruby version from the Ruby version listbox.
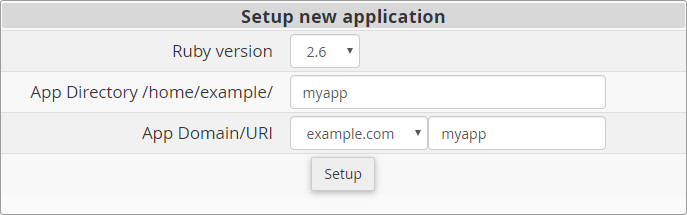
- Enter the desired application name in the App Directory text box.
Select a domain in the App Domain/URI listbox.
You must select a domain even if you will not be using Ruby for a website.- Optionally, enter a path in the App Domain/URI text box.
- Click the button. The application is set up and a new application detail form is added to the page.
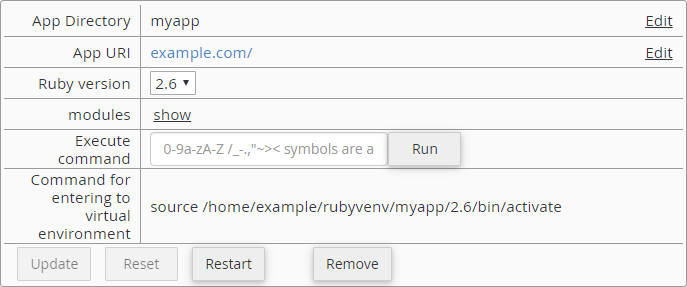
The Ruby Selector adds several lines to the domain selected in step X above.
# DO NOT REMOVE. CLOUDLINUX PASSENGER CONFIGURATION BEGIN
PassengerAppRoot "/home/example/myapp"
PassengerBaseURI "/"
PassengerRuby "/home/pinebrea/rubyvenv/myapp/2.6/bin/ruby"
# DO NOT REMOVE. CLOUDLINUX PASSENGER CONFIGURATION END
If you will not be using Ruby for your website you must remove these lines from the .htaccess file.
To use the new environment follow these steps:
- Copy the Command for entering to virtual environment from the application detail form.
- Log in to your account using SSH.
Paste the Command for entering to virtual environment on the command line and press enter. The command prompt will change as shown.
[email protected] [~]# source /home/example/rubyvenv/myapp/2.6/bin/activate
(myapp:2.6)[email protected] [~]#
Enter the following command to check that the installation is successfull:
(myapp:2.6)[email protected] [~]# ruby -v
ruby 2.6.1p33 (2019-01-30 revision 66950) [x86_64-linux]
Exit the virtual environment by typing deactivate as shown.
(myapp:2.6)[email protected] [~]# deactivate
[email protected] [~]#
You can repeat the steps above to configure several versions of Ruby for use in your account.
You must enter the related Command for entering to virtual environment each time you want to use a configured version of Ruby.
Article Details
- Control Panel: cPanel
- Product: Reseller Hosting Shared HostingTurbo Web Hosting
- Level: Advanced
Did you find this article helpful? Then you'll love our support. Experience the A2 Hosting difference today and get a pre-secured, pre-optimized website. Check out our web hosting plans today.